tilauscope_fork
Preparing a roast
!!! abstract “Artisan does / TilauScope adds” Artisan does — offers a roast properties dialog where every field is typed in by hand, and a PID whose setpoint is set manually before each batch.
**TilauScope adds** — a preparation sheet that already knows which coffee is being
roasted, reads the batch weight off the scale, judges the batch before it starts, and
starts preheating on its own. Nothing is written to the roast until the sheet is
confirmed.
Selecting a bean in BeanCave and choosing Roast opens ROAST SETUP, a sheet in four tabs. Plan, beside it on the bean record, opens the same sheet straight on its ⓘ PLAN tab — to see what a batch would look like without roasting it, since opening the sheet commits to nothing: preheating only starts with the roast. Everything below lives there, unless stated otherwise.
The bean and the batch
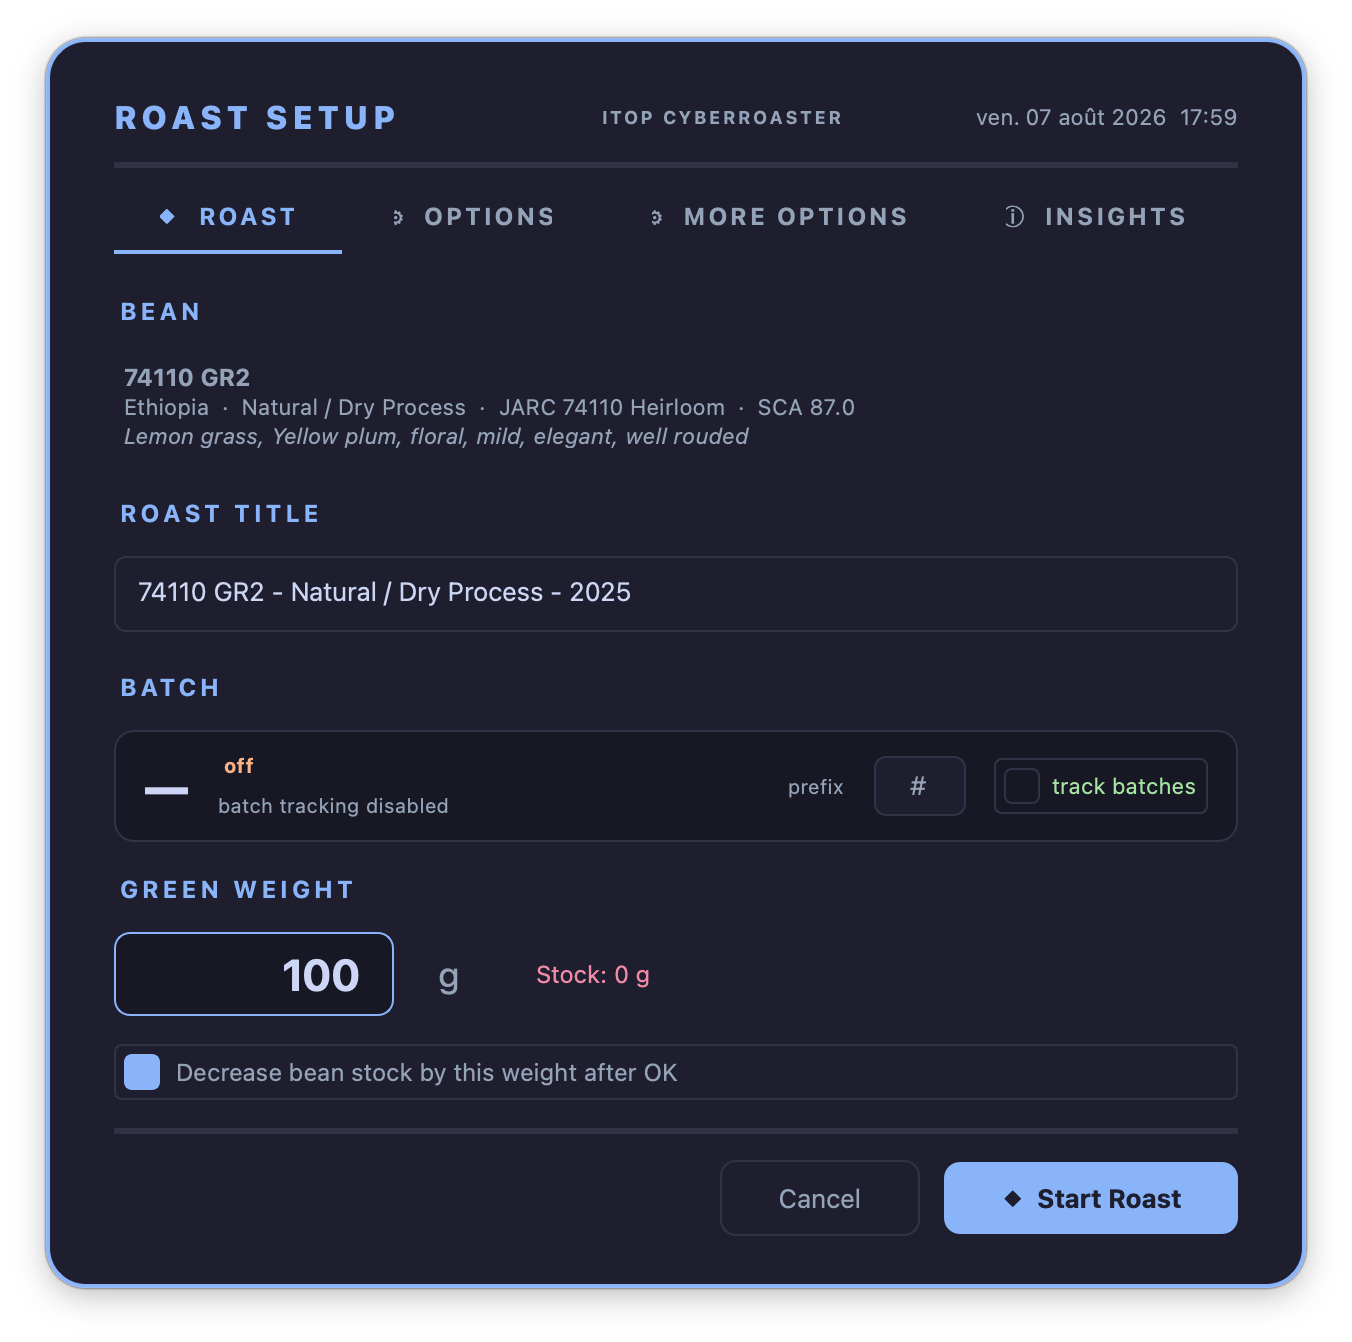
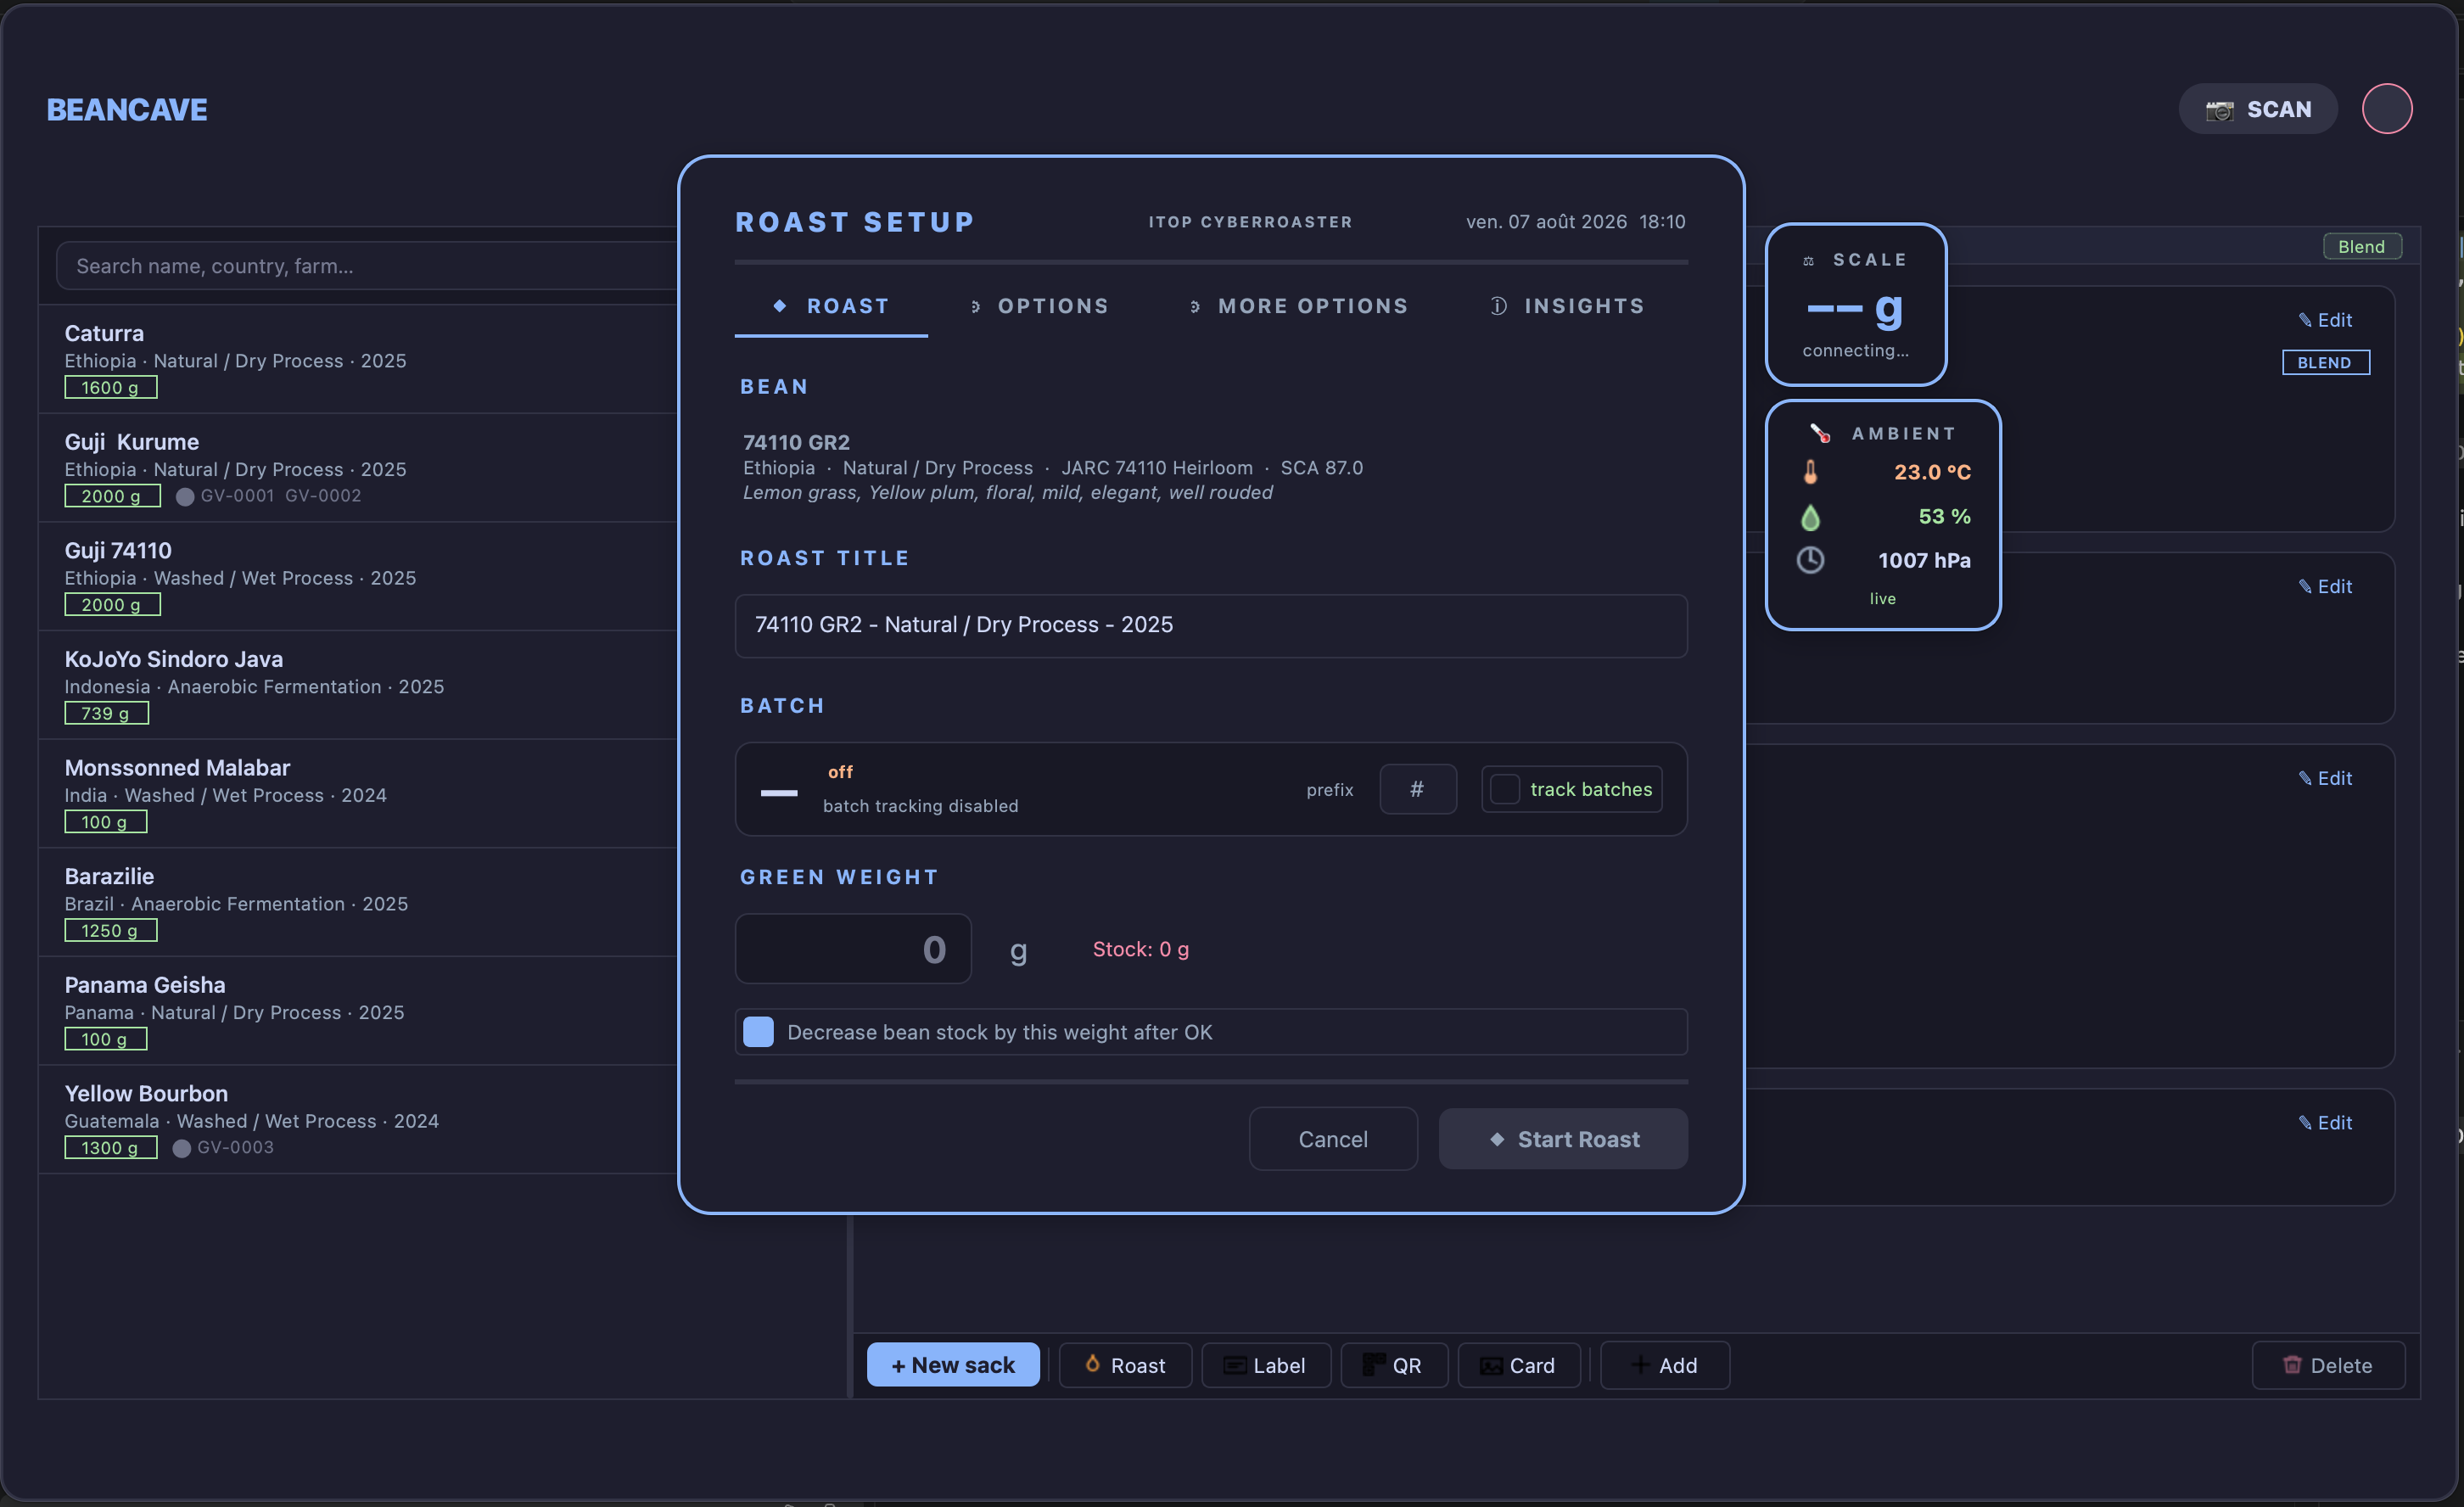
The ⬥ ROAST tab opens with the coffee itself: name, origin, farm, process, variety, altitude, SCA score — pulled from its BeanCave record, so the coffee about to be roasted can be checked at a glance without going back to the database.
Roast title is pre-filled from the bean name, process and harvest year, and remains editable.
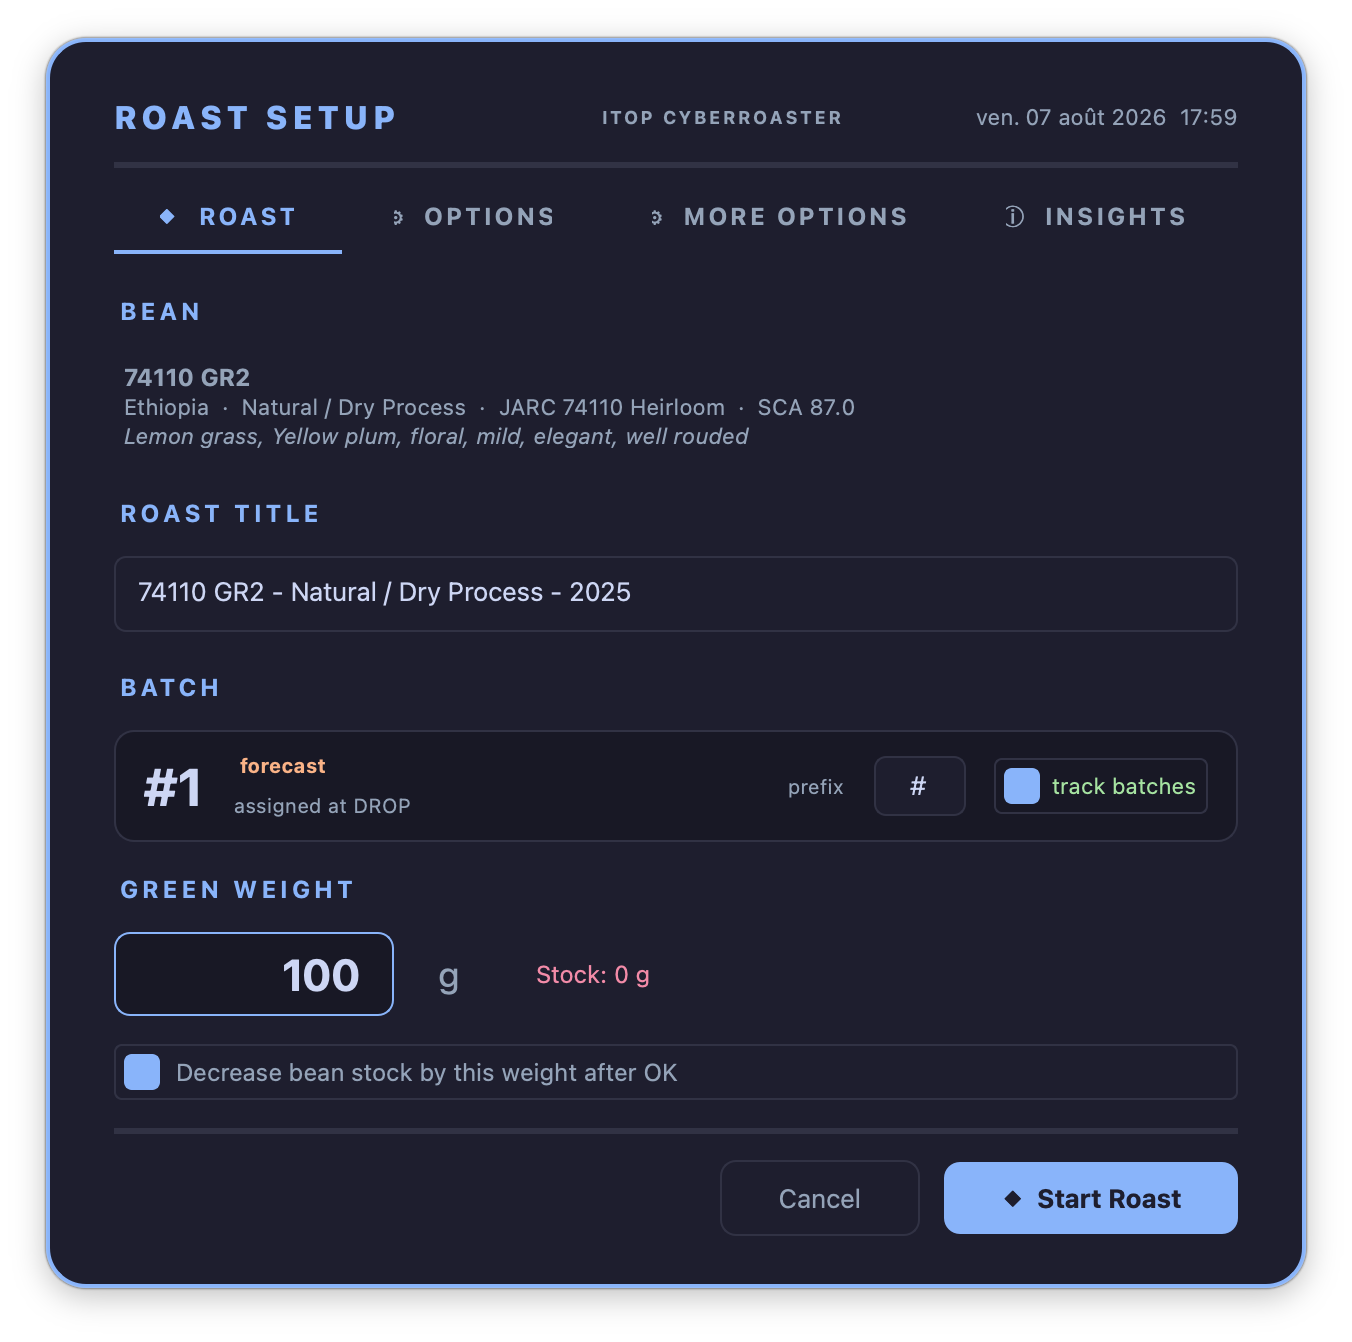
Batch shows the number this roast will receive, and a track batches checkbox turns numbering on without opening Artisan’s own batch dialog.
!!! note The batch number shown is a forecast. It is only consumed at DROP, so opening and closing the sheet, or abandoning a roast, never burns a number.
Green weight drives everything downstream — the roast plan, the stock count, the weight loss figure. It opens on the weight of the last batch of this coffee, marked last batch, since a bag is usually worked through at one batch size. That figure is a proposal: Start Roast stays disabled until the batch has been weighed on the scale or the weight typed in, because a roast planned on last week’s weight produces a wrong plan and a meaningless yield.
Ticking Decrease bean stock by this weight after OK takes the batch out of the bag’s stock in BeanCave, with no second entry.
↺ Rebuild from bean regenerates the descriptive bean text that Artisan stores in the roast file, straight from the BeanCave record.
Weighing from the scale
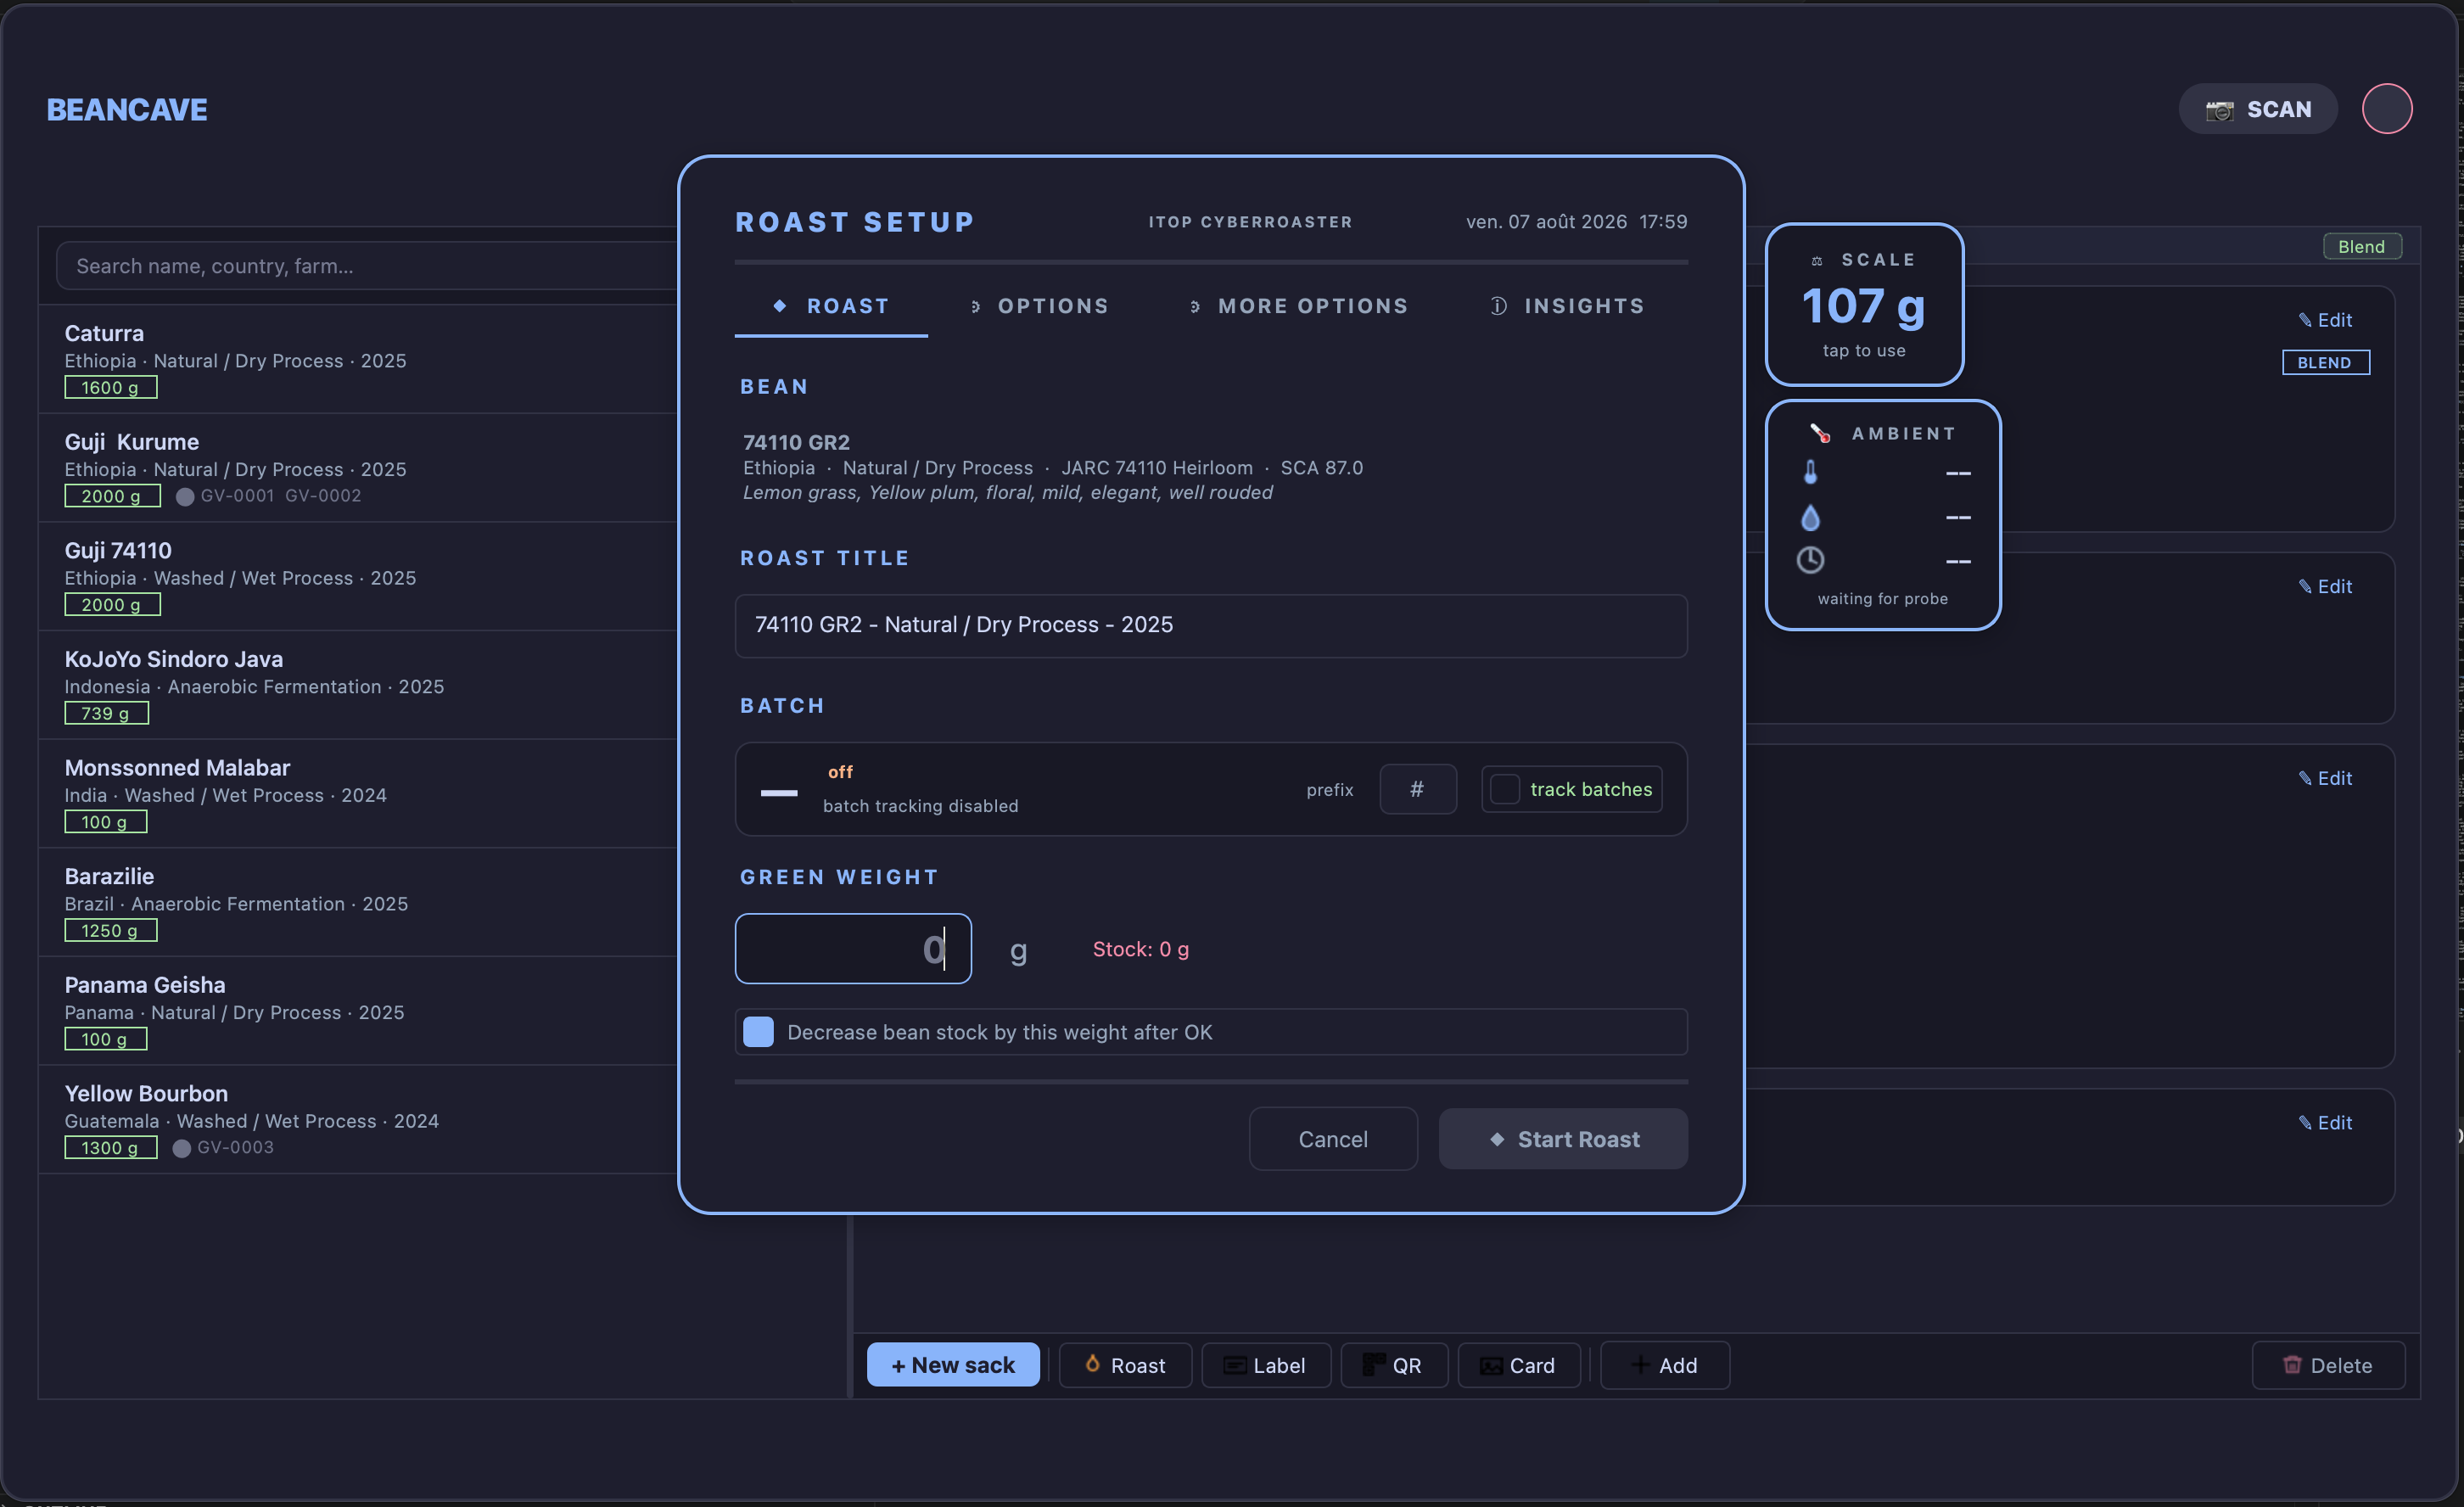
With a Bluetooth scale paired, a ⚖ SCALE window floats beside the sheet showing live weight. Clicking the value writes it into Green weight; double-clicking it tares the scale. No retyping, and no leaving the sheet.
If a weight has already been entered by hand, TilauScope asks Replace Weight? first, rather than silently overwriting it.
The line under the value says what the scale is doing: tap to use when a reading is live, connecting… while the link is being established, disconnected when it is lost, and no scale — tap to retry when it could not be reached. A scale that has gone idle is asked again for about a minute; tapping the empty value asks once more. The scale stays connected after the sheet is confirmed, so it is still live at the end of the roast.
What the coffee and the room are doing
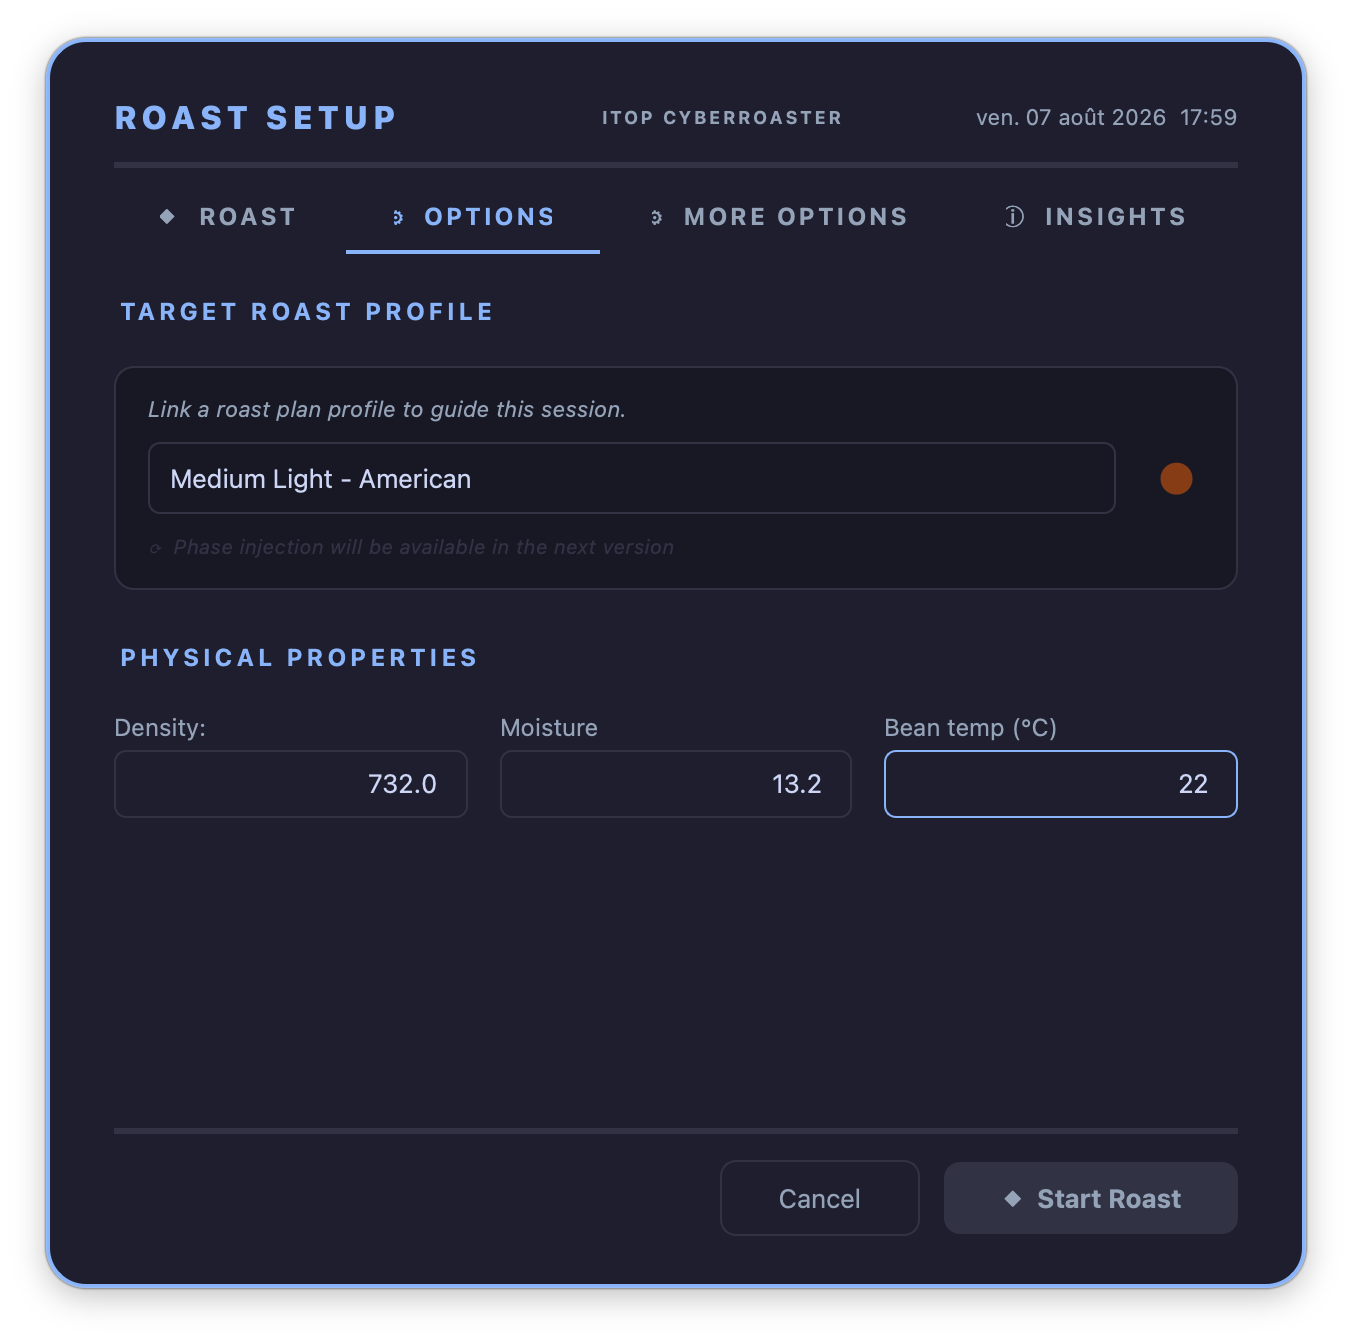
The ⚙ OPTIONS tab holds Physical properties: density, moisture and green bean temperature, pre-filled from the BeanCave record where they are known. These three feed the roast plan directly and shape the projected drying time — a humid, dense coffee does not dry like a dry, light one. The coffee’s screen size, when the record has one, is written into the roast’s properties at the same time; it is kept with the roast and does not change the plan.
With an ambient probe configured, a 🌡 AMBIENT window floats beside the sheet with live room temperature, humidity and pressure, and those readings are stored in the roast file when the sheet is confirmed. The day’s conditions are recorded and accounted for without being typed in, and the plan is redrawn when the room changes.
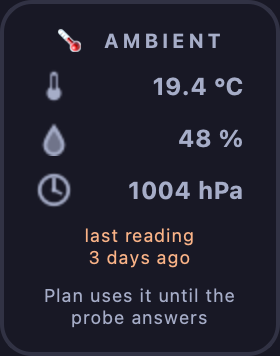
The window remembers the probe’s last reading. When the probe does not answer — a plan prepared on a laptop away from the roaster, or a probe switched off — the window shows that reading greyed out, with its age (last reading · 3 days ago), and the plan is built on it until the probe answers again. A probe that has never been read says waiting for probe and names what the plan uses meanwhile, for example Plan now uses 20 °C, sea level.
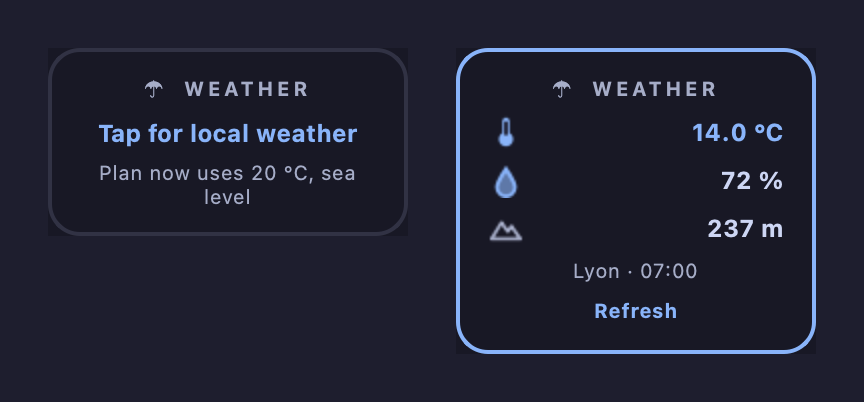
Without an ambient probe, a ☂ WEATHER window takes its place. It does nothing until it is tapped: Tap for local weather reads the temperature, humidity, pressure and altitude of your town online — after asking, the first time, since finding your town means handing your internet address to a lookup service abroad (see Configuration). I’ll type it offers the three values to fill in by hand instead; a typed altitude is remembered for the next roasts. Online weather reads the temperature outside, which in winter can be far from the room’s — type the room’s own figure when the two differ.
The altitude matters for the plan: water boils at a lower temperature up a mountain, and the plan expects first crack about 1 °C lower for every 300 m — some 8 °C lower at 2,500 m than at sea level. The plan takes the altitude from the probe, otherwise from the weather or the typed value, otherwise from Artisan’s own altitude setting, and assumes sea level when none of them has one.
Room temperature matters more here than it looks: the beans start at it, and ten degrees between a winter morning and a summer afternoon is worth roughly twenty seconds of drying on a 400 g batch. The plan accounts for it. Room humidity is recorded but does not change the plan — it acts on green coffee in storage, not on the roast in progress.
Target roast profile sets the Agtron level being aimed for. It drives the roast plan and the roadmap on the PLAN tab, where the same choice can be made.
Saying what the coffee is for
The ⚙ OPTIONS tab opens on Roast intent, above the target profile, because it decides what that profile has to serve.
What is this coffee for? — Filter, Omni or Espresso. It is the one thing here you choose; everything else on the card is read for you. The choice sets the development time: filter the shortest, espresso the longest, omni between the two. The gap is a handful of seconds, which is enough to be tasted, and it carries through to the drop temperature and to the weight loss to aim for. Your choice is remembered for the next roast, and the same choice sits on the PLAN tab and in the guided assistant — one setting, three places to set it.
Bean family states what TilauScope read from the coffee’s variety and what it did with it — for example Bourbon — takes a slower roast (−4 °C on the charge). When the record names no variety, or names one that is not placed in a family, it says not known — using the standard pace and the charge is exactly what it would have been before. The line is there so the adjustment is visible rather than silently applied.
When you tasted the last roast of this coffee and something was off, a second line recalls it with the change the plan made — for example 💡 Last time: Flat, papery — Keep the burner one notch higher after first crack (70 → 75 %). See Tasting.
Judging the batch before it starts
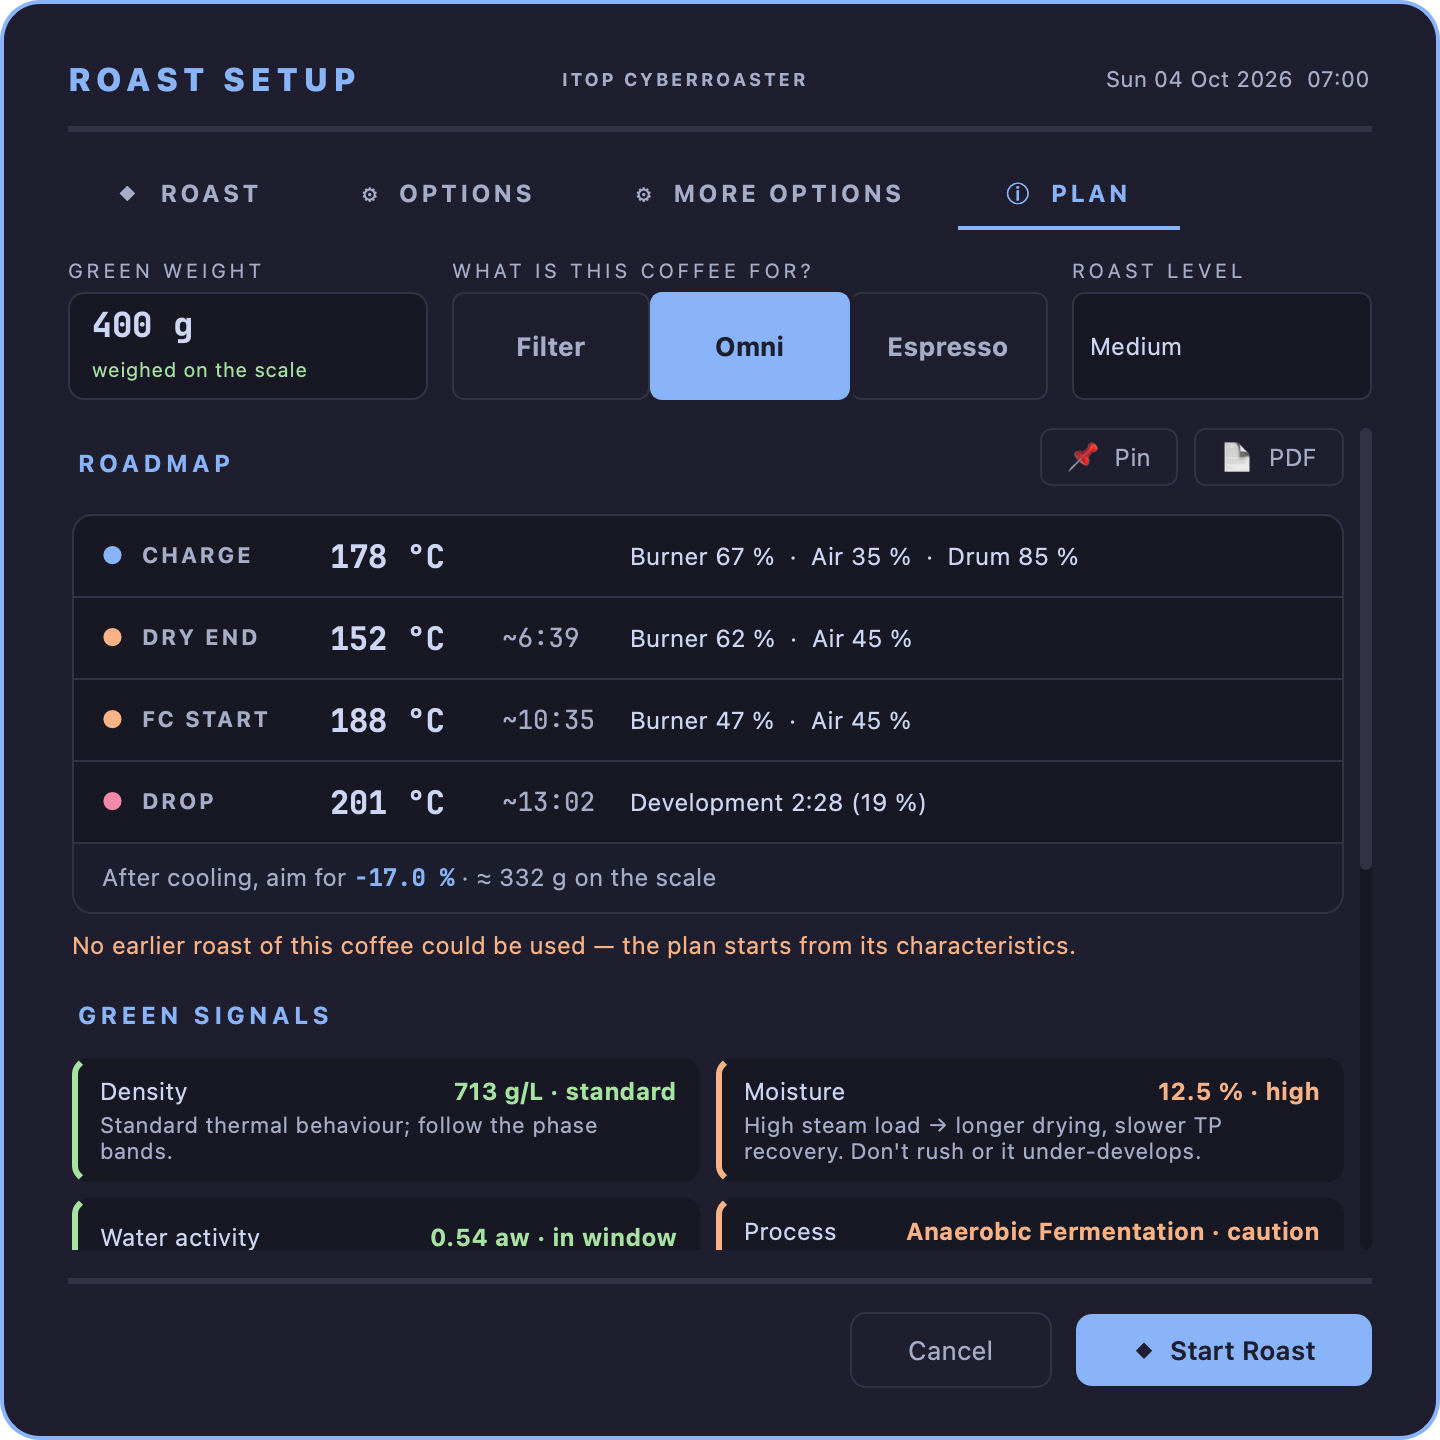
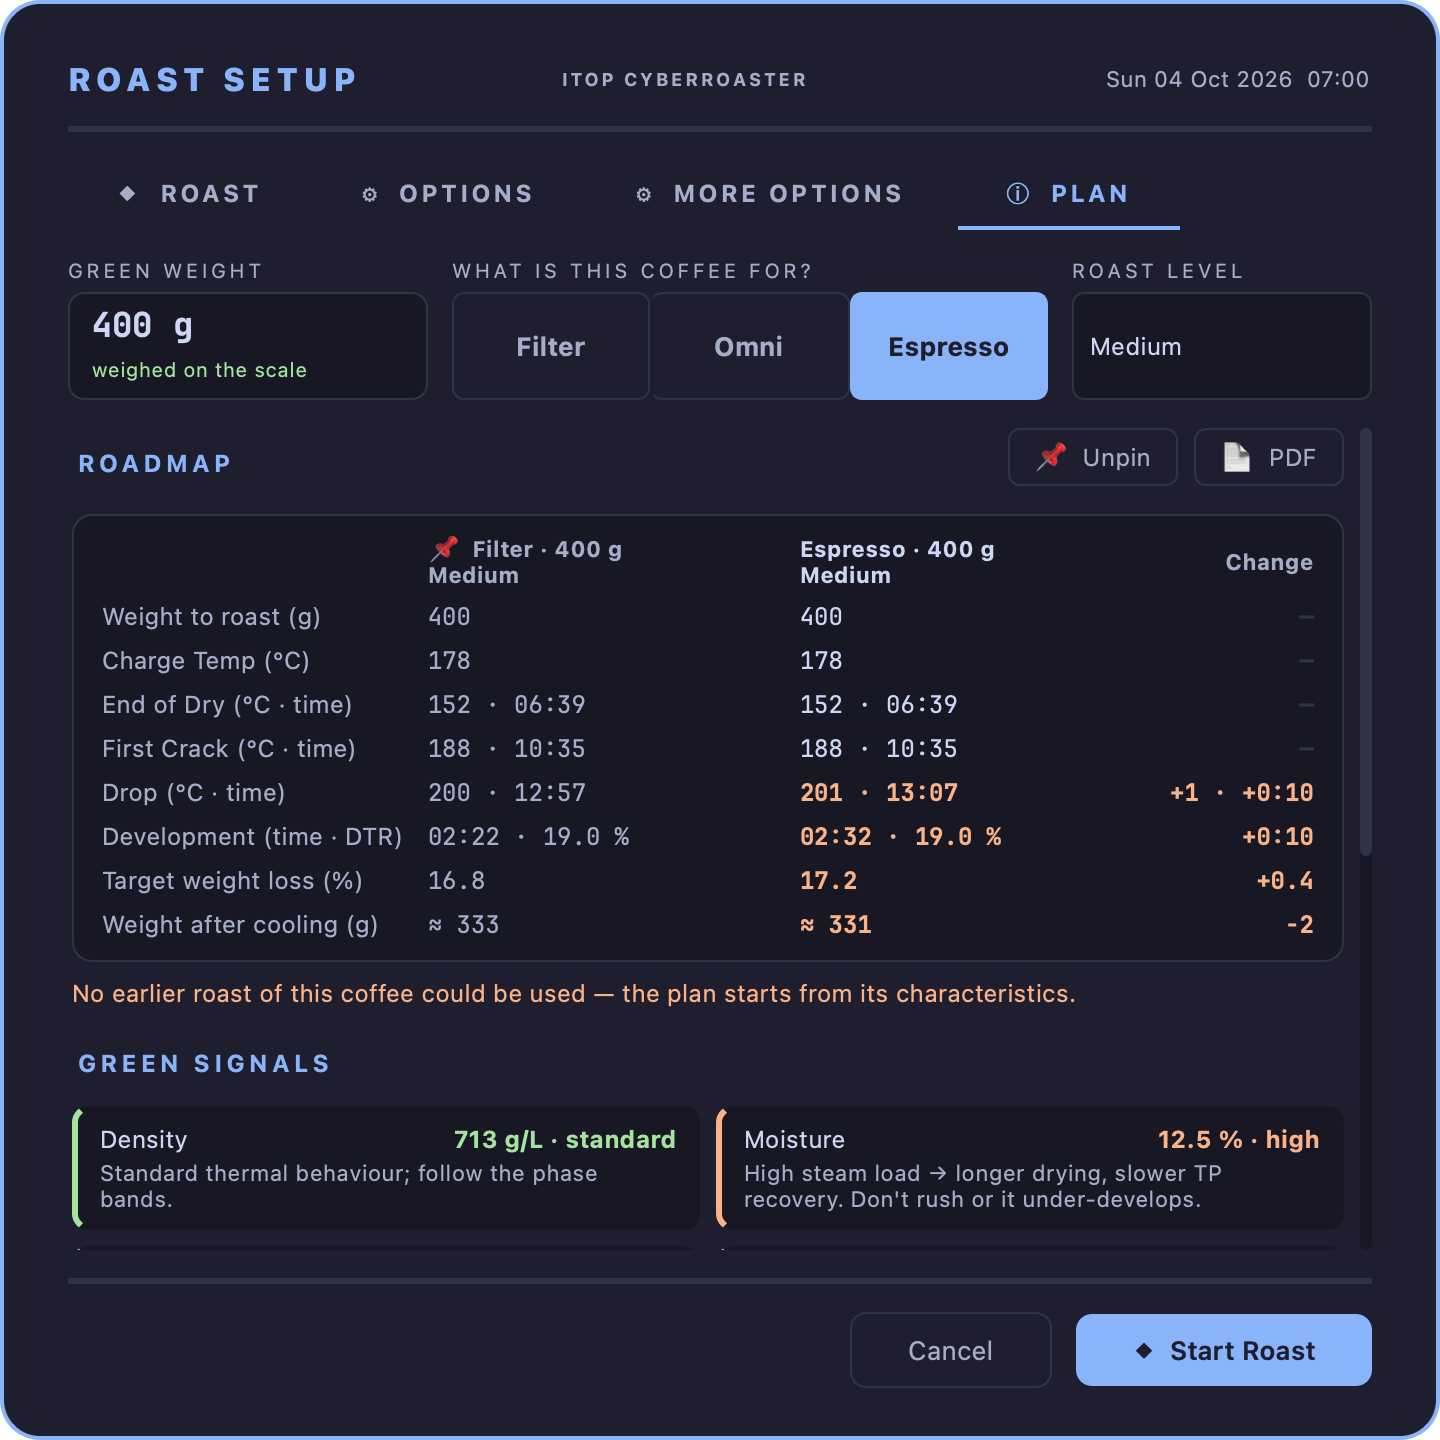
The ⓘ PLAN tab shows the roast before it happens. Three choices stay at the top while the rest scrolls: the green weight — tap it to take the scale’s reading; it says whether the weight was weighed on the scale, entered by hand or is still the last batch proposal —, What is this coffee for?, and the roast level. They are the same settings as on the other tabs: changing one here changes it there.
Roadmap is the plan in four lines — CHARGE, DRY END, FC START and DROP — each with its bean temperature, the time it should arrive and the burner, air and drum settings to have in place as the roast reaches it. A last line gives the weight loss to aim for after cooling and what the batch should then weigh on the scale. The charge line comes first because it is the first figure you act on: it is the temperature to preheat to, whether you let TilauPID do it or heat by hand.
Under the roadmap, one line says what the plan rests on — Based on 4 roasts of this coffee, or, for a coffee never roasted, that the plan starts from its characteristics and is worth adjusting after tasting. A single earlier roast is too few to learn from: the plan then also starts from the coffee’s characteristics, and the line says so. When you tasted the last roast and something was off, the change the plan made for it is recalled there too.
📌 Pin sets the current plan aside so it can be compared with another: pin it, then change the weight, the use or the level, and the roadmap becomes a table of both plans side by side with what moved — later first crack, longer development, a lighter batch after cooling. Unpin returns to the single roadmap.
📄 PDF saves the plan as a document to keep at hand during the roast, with the full detail described in The roast plan. With a plan pinned, the PDF opens with a comparison page of the two. The plan’s alarm set is saved beside it, to load later from the alarm editor.
At the Expert level, Load the plan’s alarms at start replaces your current alarms with the plan’s when the roast starts. It is off by default, because it overwrites alarms you may have written yourself.
Below the plan:
Green signals flags whatever is outside the norm in this coffee or this batch size, and what it implies for the roast.
Load & setup shows whether the batch suits the machine, with a fill bar for under- and overloading.
Phase cheat-sheet (RoR) gives the RoR bands worth holding in each phase, available before the roast rather than discovered during it.
STRATEGY condenses the whole thing into one sentence for this coffee, on this machine, at this target.
Automating the start
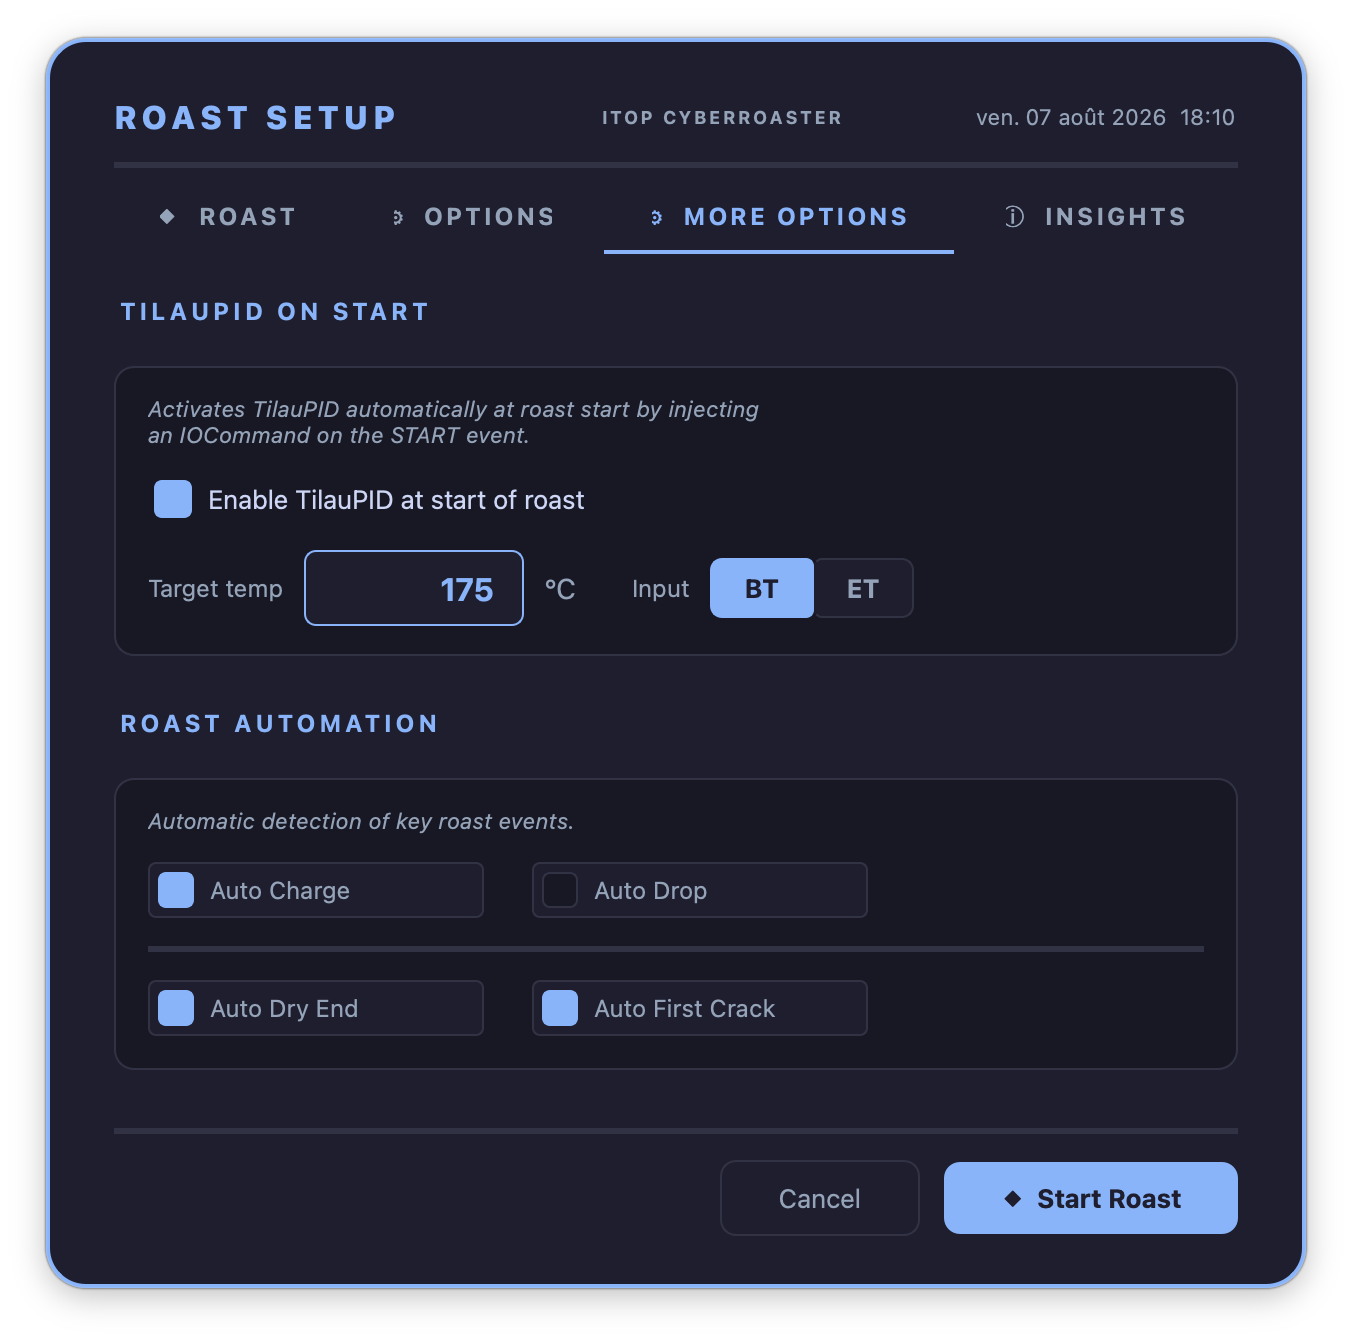
The ⚙ MORE OPTIONS tab decides what happens without being asked.
Enable TilauPID at start of roast, with its Target temp, starts preheating the moment START is pressed — see Preheating: TilauPID below for what it then does. Input: BT / ET chooses whether preheating aims at bean temperature or at air temperature; it is not offered for a machine without an air probe, where preheating always aims at bean temperature. When a roast plan is selected, its charge temperature fills this setpoint automatically and is also applied to the SV slider — until you type a setpoint of your own. From then on the field is yours: the plan stops replacing it and states its own figure beside it instead, as Plan recommends 186 °C, with use to go back to it in one click. The recommendation only appears while the two differ. During preheating, the joined PID ON / PID OFF control in the graph toolbar lets you temporarily enable or disable TilauPID; it disappears once CHARGE is marked. Choosing PID OFF also removes TilauPID from the preheating status immediately.
Under Roast automation, four milestones can be marked automatically:
| Option | What it does |
|---|---|
| Auto Charge | Marks CHARGE on its own. |
| Auto Drop | Marks DROP on its own. |
| Auto Dry End | Marks dry end on its own. |
| Auto First Crack | Marks first crack when bean temperature reaches the first-crack target, sooner if a burst of cracks is heard. |
!!! note “Auto Dry End has a prerequisite” It needs a Dry-phase BT target set in Artisan → Phases. Without one, the box can still be ticked but the automation is switched off when the sheet is confirmed, and TilauScope says so: Set a Dry-phase BT target in Artisan Phases first. The feature is not broken — it has nothing to aim at.
!!! info “Hardware — Auto First Crack” Automatic first-crack marking needs a crack counter among your devices — an acoustic source such as the TilauAmbient probe. See Hardware and peripherals. It also waits for dry end to be marked before it starts looking. The DETECTION tab in Configuration says which of the two is missing, and lets you set how much temperature tolerance the target gets.
Under Roast Replay, a background curve loaded before the sheet was opened can be replayed live during the roast: Enable roast replay turns it on, and Burner reaction time sets how far ahead the replay looks when following the curve — see Roast Replay in the glossary. The box stays unavailable, with a short explanation, until a background curve is loaded and the machine profile supports replay. Choosing replay switches the roast to the Expert level for as long as the replay lasts: a replay follows a recorded curve, not the guided plan. This is borrowed, not kept — the level you normally roast at comes back when the replay ends, along with the assistant exactly as you left it, docked or detached, open or closed, and the app opens that way next time. Automatic dry-end and first-crack detection also stands down for the duration: a replayed roast takes its milestones from the curve it follows, and a mark placed a moment beside that curve would be a milestone the replay never had.
!!! note “Stopping a replay mid-roast” A header button next to the operator level control mirrors this setting once the roast is running, and turns replay off immediately — too much drift from the curve, or a change of mind, does not need the roast to be interrupted. It stops every playback mode at once, including the one that marks DROP from the recorded curve, so nothing is left able to end the roast on its own. The same button lights up, and works the same way, for a playback you armed yourself in Artisan’s own Background dialog. Changing the roasting machine in Settings while the window is open disarms an already-running replay the same way, since a replay armed for one machine’s profile no longer applies once the machine changes.
Telling TilauScope which machine it is
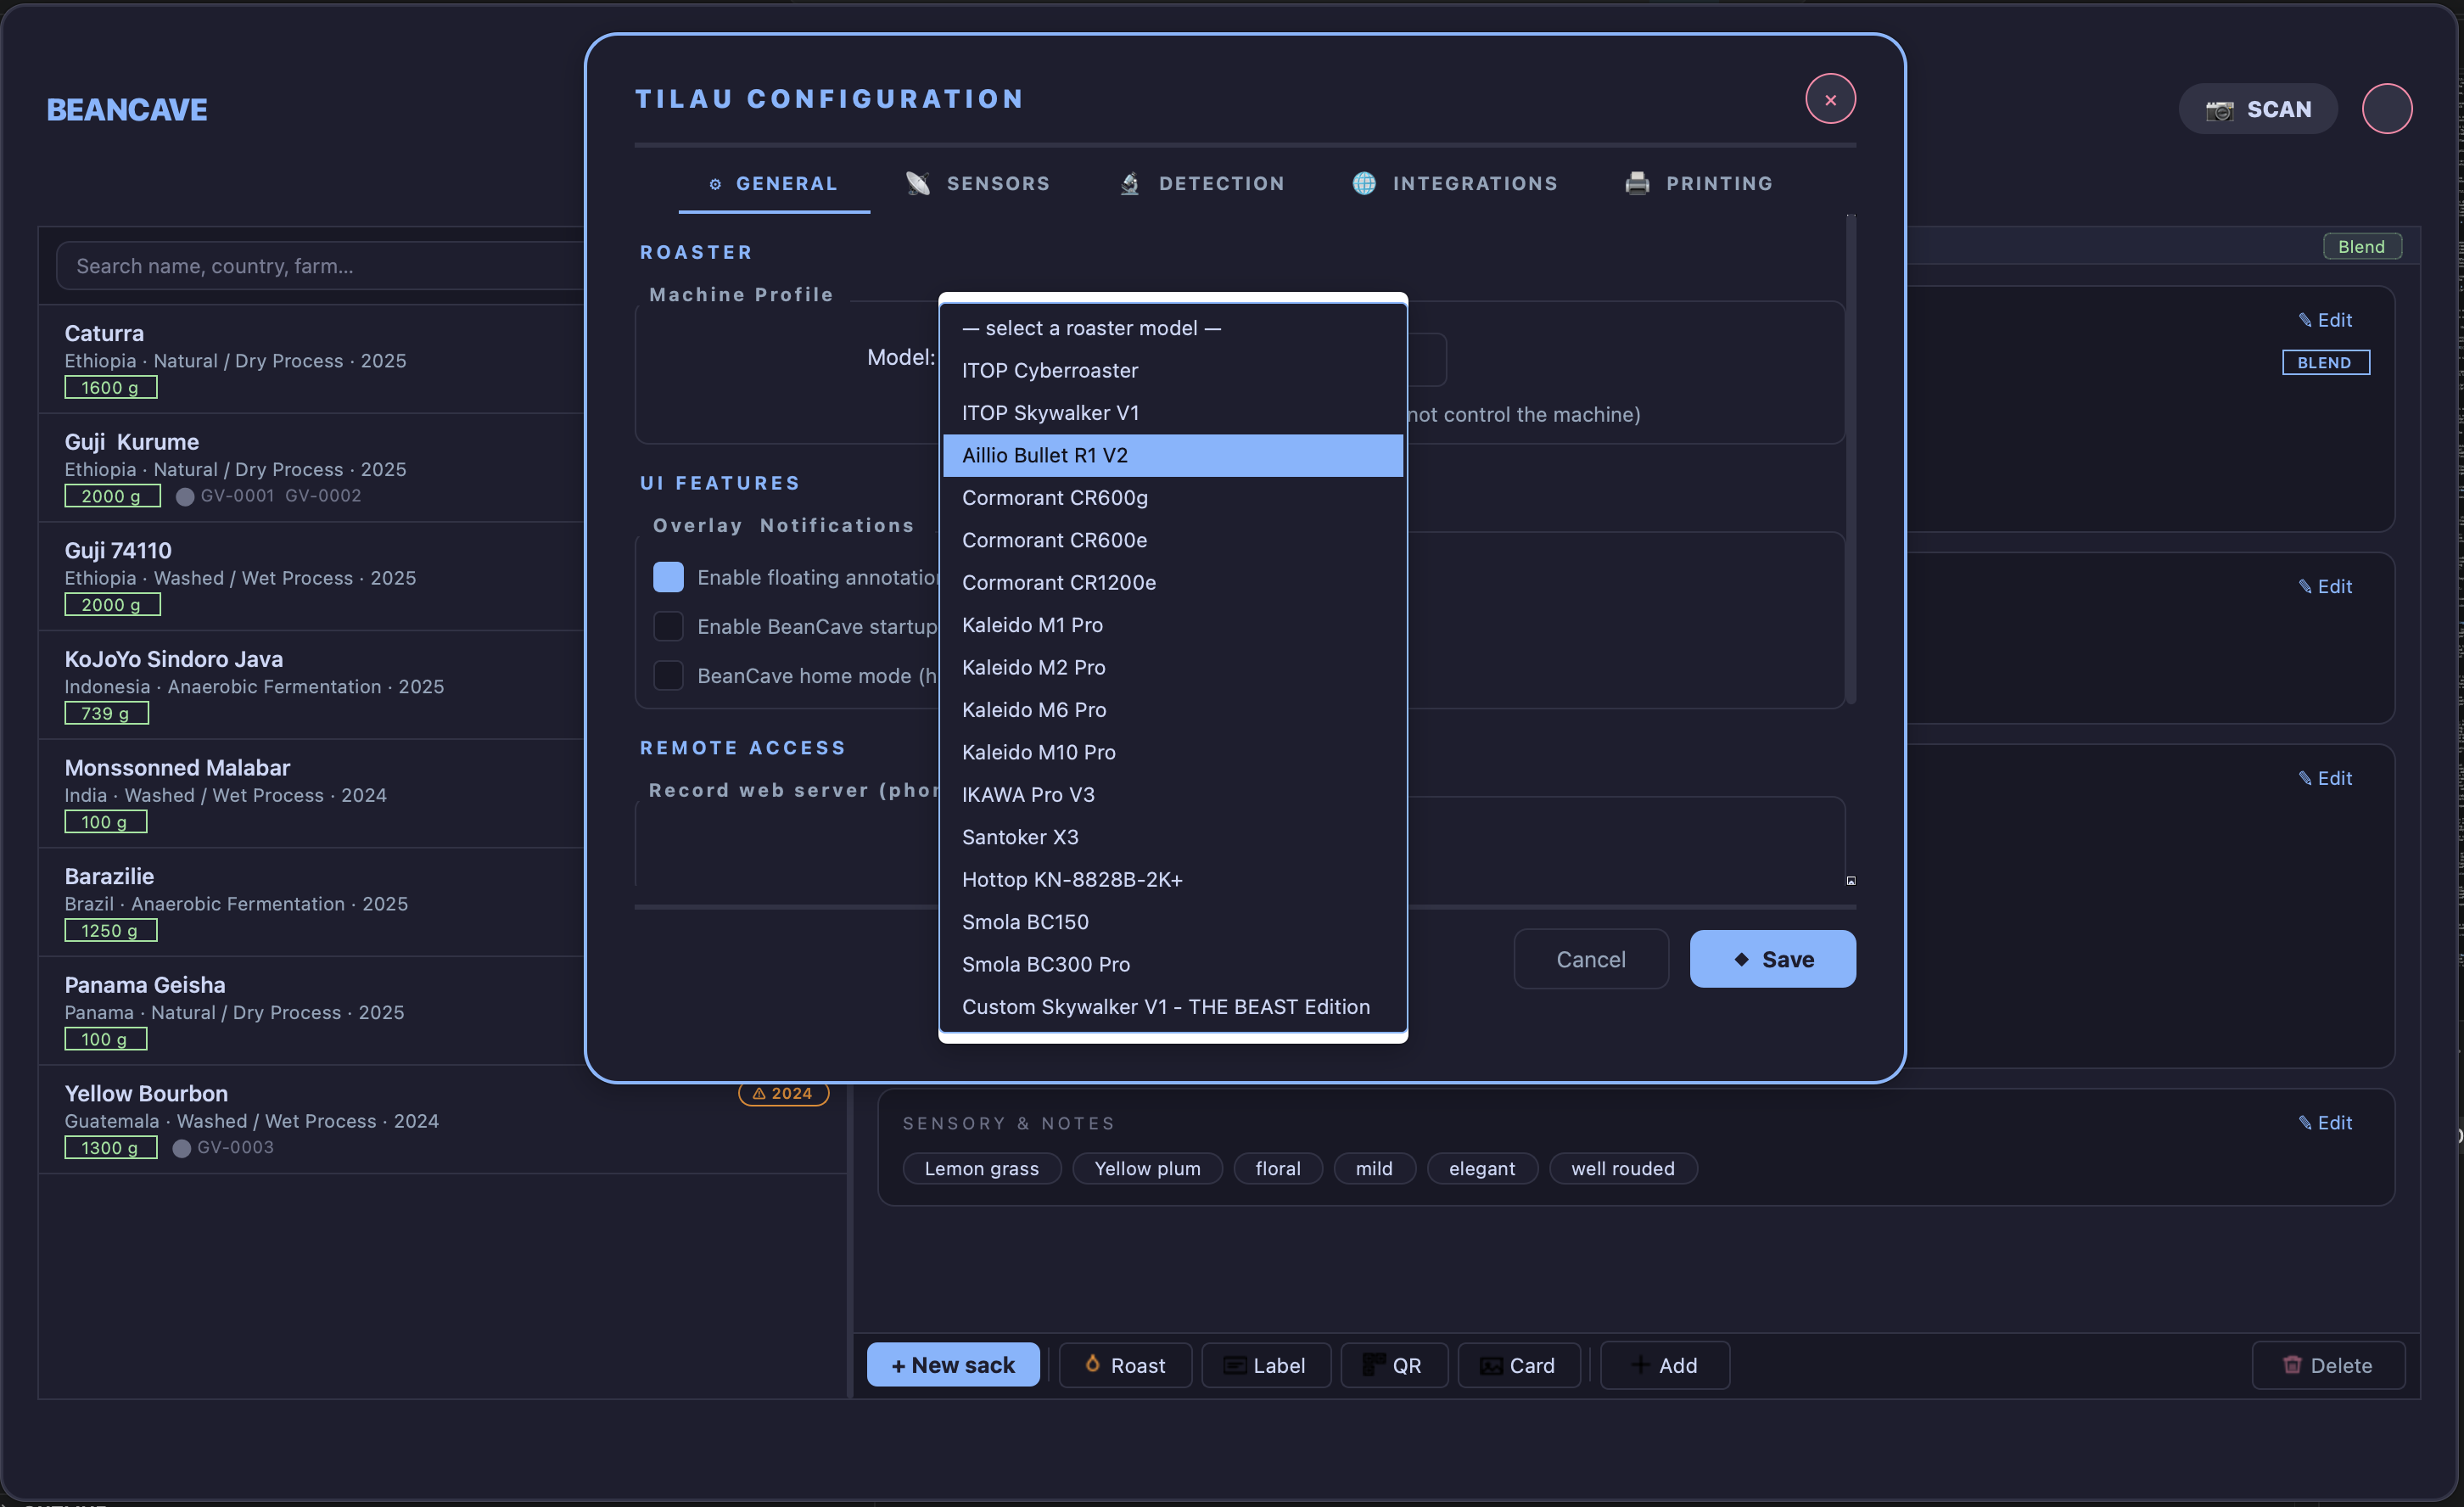
The machine profile is not part of the sheet — it is set once, in TilauScope → TilauScope Config…, under Machine Profile → Model, from sixteen predefined roasters. See Configuration for the full detail of that dialog.
The profile is what makes the guidance specific: the roast plan, the pre-roast benchmarks, the slider labels and the load checks all follow from the machine’s real characteristics — its thermal mass, the top rate of rise it can reach, how finely its controls can be set. The turning point is a special case: how far the temperature dives after charging depends above all on how much coffee went in, so the plan places its opening dip from the batch size — a small batch turns markedly higher than a full drum charged to the same temperature. It remains a placeholder rather than a prediction, because the firing decides the rest: the plan replaces it with the real turning point the moment it happens, about a minute in, and re-times everything that follows.
Machines TilauScope cannot drive
For a machine adjusted entirely by hand, tick Read-only (monitoring only — Artisan does not control the machine). Every control slider disappears — in Artisan and in the assistant — and the application confines itself to recording BT and ET. Guidance becomes advice to act on rather than a control to move.
Unticking it restores the sliders exactly as they were, so a manual slider setup is not overwritten by a trip through read-only mode.
An uncatalogued roaster needs no profile at all: leave Model on — select a roaster model — and tick read-only.
Drum speed is set before the roast, not during it
Drum speed is treated as a setup parameter. It is computed once for the batch, from weight and density, and applied at CHARGE — then left alone. On machines where changing drum speed mid-roast disturbs the temperature reading, TilauScope will not propose the gesture at all.
There is nothing to set: the value arrives with the roast plan and needs no attention. It is listed here because when drum speed is decided matters — see The roast plan for the value itself, and The guided roast for what happens at charge.
Preheating: TilauPID
Preheating decides how the first two minutes of the roast will go. Charge into a machine that has not settled, or into one that has overshot and is on its way back down, and the drying phase is already compromised before any lever has been touched. TilauPID exists to make that starting point repeatable, which is why it is worth understanding rather than simply leaving switched on.
Ordinary PID control chases the error it can see right now: it heats until the setpoint is reached, by which point the machine’s stored heat is still arriving and the temperature sails past. TilauPID instead steers on where the temperature is projected to end up, so it eases off before the setpoint rather than after it.
Once the machine has remained close to the setpoint with an almost flat rate of rise for ten seconds, a deliberately slow integral trim removes any small remaining temperature offset. It cannot act during the ramp or a fast approach, is limited to six burner percentage points and unwinds when the machine leaves the hold zone. This gives the steady hold time to settle without allowing accumulated correction to drive the next approach or an overshoot.
During preheating
Between START and CHARGE, the assistant shows its Preheat page: how far the machine is from the setpoint, which way RoR is trending, and one instruction to act on. The page comments on what it is doing rather than leaving you guessing — PID ramping to SV — let it work, charge when BT is stable ± 2°, then Approaching SV — PID will cut heat; slight overshoot is normal, and finally ✅ SV reached — stabilize then charge. The charge button becomes available once bean temperature is stable.
The page carries a Burner slider, so preheating can be corrected by hand without leaving the assistant. On a read-only machine the slider is hidden.
TilauPID stops applying heat immediately if its selected temperature reading disappears, becomes invalid or changes in a way the machine cannot physically produce. A single bad reading holds the burner at zero until three valid readings have followed it. Repeated bad readings, a frozen sensor while the machine should be heating, or several seconds without a reading stop preheating and show a message; press START again only after checking the probe and its connection. A probe that alternates between good and bad readings never settles into either state, so preheating also stops if the burner has been held at zero for twenty seconds without the reading recovering — rather than staying at zero, silently, for the whole preheat. All of these delays are counted on the sampling interval, which TilauScope fixes at one reading per second. An interrupted or sensor-degraded preheat is never used to recalibrate the controller.
In Simulator, replay can run faster than real time. TilauPID therefore does not apply its wall-clock jump, frozen-sensor or missing-update tests to replayed samples; a fast but valid recorded temperature cannot latch the controller off. Missing, non-numeric and out-of-range values are still rejected, while all temporal protections remain active on a real machine.
Following the preheat on the roast graph
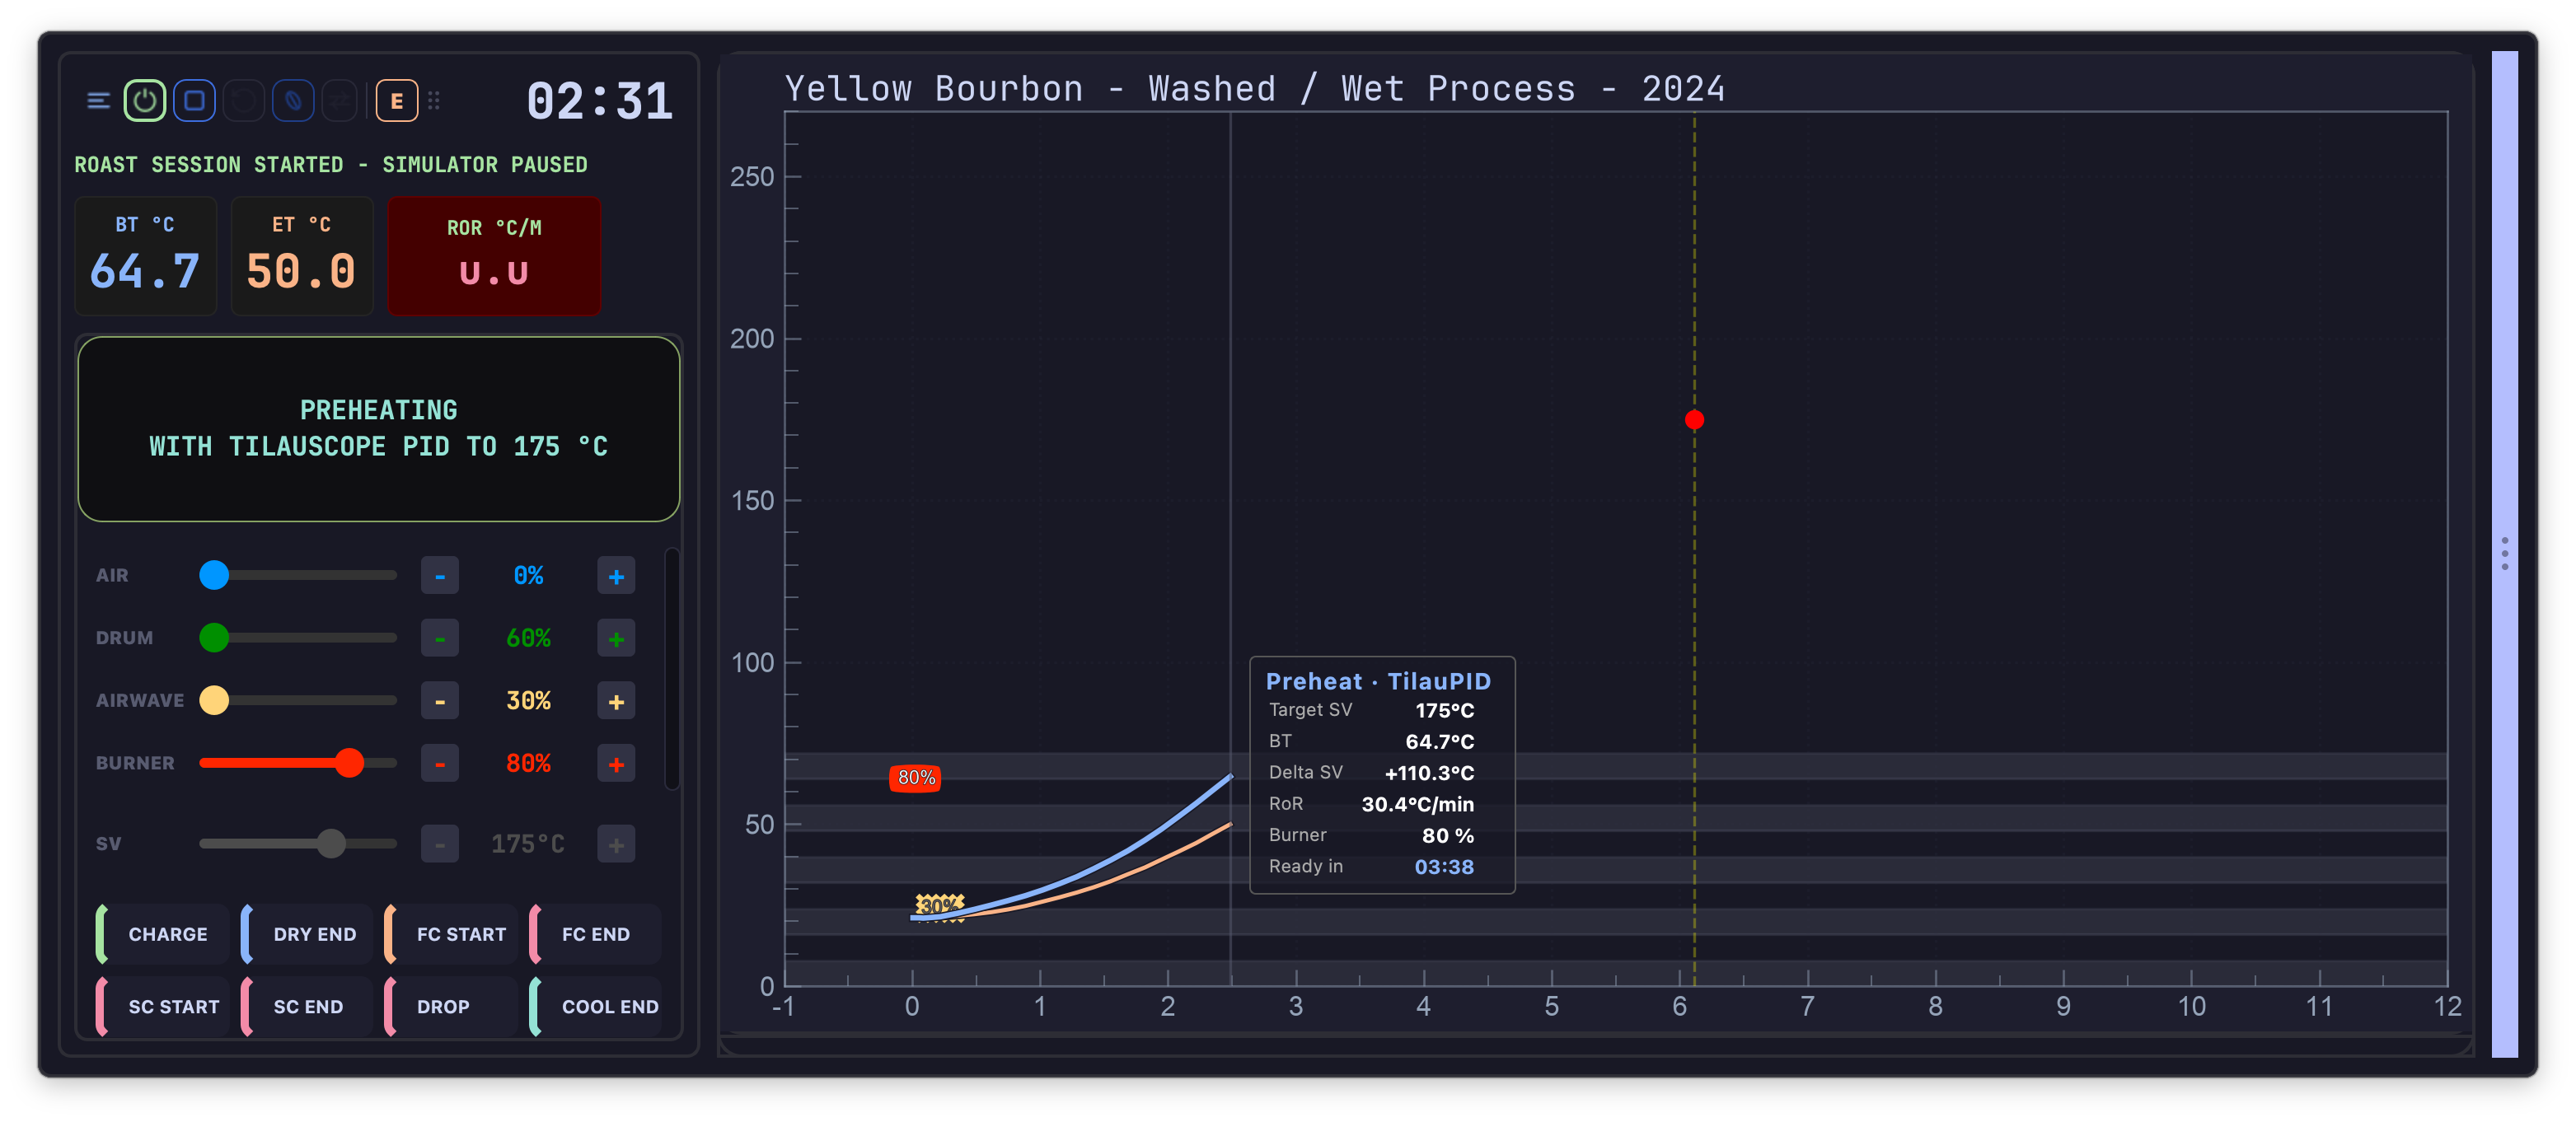
The graph draws the climb up to the charge as soon as the machine is being read, whether TilauPID is driving it or you are heating by hand. Until a first temperature arrives it says which of the three nothings you are looking at: no roaster chosen yet, a machine that has not answered, or a reading in hand and the charge still to come. Time runs from the moment the probes started, the temperature scale opens as far as the drum goes, and every burner, air or drum setting you play during the preheat is placed on that time — so a hand-driven preheat is followed on the graph exactly like a controlled one. What TilauPID adds to it is the target line, the arrival mark on that line, and the panel below.
The assistant window is not required to see what preheating is doing. Whenever TilauPID is running, a Preheat panel is drawn on the roast graph itself, next to the bean temperature curve, and stays there until CHARGE is marked. It shows a countdown to the target setpoint and a bar tracking the climb toward it, on whichever temperature the Input setting steers on — bean or air. The header changes colour as the machine closes in. Early in the climb, while an arrival time would be pure guesswork, the panel simply reads Heating; it switches to Stabilizing when the power is easing off before the target, and to Ready to charge, in green, once the temperature is within 2 °C (3.6 °F) of the setpoint, below or above it. A machine that overshoots beyond that band reads Stabilizing until it comes back into it. Bean/air temperature, RoR and burner power are not repeated here — they are already on the graph and its LCDs.
Below the countdown, an Experience reading states how much TilauPID already knows about heating to this exact setpoint — see It learns your machine below for what the four levels mean.
This is a leaner version of the same story the assistant’s Preheat page tells, for roasting straight from the Artisan window.
It learns your machine
Preheating calibrates itself across roasts. Two things are re-derived from your own previous roasts at the same setpoint: the power needed to hold that temperature, and how early to ease off to arrive without overshooting. Both are properties of your machine and your room, not of a specification sheet — which is why they are measured rather than assumed.
The Preheat panel states where that learning stands as an Experience reading: Learning the first time this exact setpoint is used, Estimated once a nearby setpoint or the machine’s general thermal behaviour can stand in for it, Tuned once real preheats at this exact setpoint have been recorded, and Calibrated once enough of them have — a settled reading, not something to chase. Two lines underneath say plainly what has and has not been learned yet: whether the holding power for this setpoint is known, estimated from other roasts, or still being found; and, separately, whether TilauPID already knows when to ease off approaching the setpoint, or is still learning that too. The two need not agree — a machine that already holds a temperature well can still be finding out how early to brake, or the other way round. In Simulator, the Experience reading says so instead of a level, since a replayed preheat teaches TilauPID nothing about the real machine.
There is no calibration button and nothing to maintain. A completed preheat can benefit the next one once it contains enough trustworthy evidence: at least a minute of observation, a complete temperature window and, for holding power, a continuous stable hold around the setpoint. TilauPID uses filtered, robust measurements and limits how far one session may move either setting, so one probe spike or unusual start cannot dominate the model.
Learning is kept separate for each machine and selected BT/ET input. Each qualified setpoint becomes a learned point at its actual temperature; between two nearby learned points, holding power and lead time are interpolated continuously. This avoids a control change simply because the requested setpoint crossed an arbitrary 10 °C boundary. Outside the learned range, the nearest point fades back to the physical or historical fallback over 15 °C, and points more than 40 °C apart are not joined as though they described one thermal regime. Existing learned 10 °C values are retained as initial interpolation points during migration. Historical profiles from another machine or input, simulated profiles, interrupted sessions and sensor-degraded sessions are ignored. Excluding a roast from cooking-plan learning does not discard its separate preheat evidence. The controller also keeps the preceding learned values and the evidence behind each update, so a bad update can be diagnosed and rolled back without changing Artisan’s profile format.
The slow hold correction itself starts from zero on every preheat. When it produces a genuinely stable hold, the resulting burner power is included in the qualified holding-power evidence; the next preheat can therefore begin with a better base value and need less integral correction.
An advanced offline identification tool can also build a thermal-model candidate from saved real preheats. The archive is analysed outside START, so this work cannot freeze the controls. The candidate then enters shadow validation: for three consecutive qualified real preheats it predicts temperature from the measured burner commands without controlling the heater. Only a candidate that remains within the prediction-error limits becomes a bounded fallback for holding power and response lead. Simulation and interrupted, short or poorly excited sessions never qualify; a later qualified failure withdraws the fallback. Direct stable-hold evidence and learned setpoint values always take priority, and no Artisan profile structure is changed.
!!! note “Checking what it learned” Each time the model is consulted, TilauPID writes a short diagnostic to the application log stating what your history suggests for that machine, input and setpoint — the holding power it settled on, how much lead time it expects to need, the thermal candidate’s shadow/active state, the number of qualified updates and the evidence used for the latest one. It is there for the roaster who wants to see the reasoning behind the preheat, or to understand why a preheat behaved differently from the last one. Nothing needs to be read for TilauPID to work.
!!! note “PID Autotune is a different tool” TilauScope → PID Autotune is a separate guided tool for Artisan’s own software PID. It first checks the setup without heating. A supported machine can then run a supervised, empty-machine test lasting about ten minutes around one stable temperature. The screen gives one preparation instruction at a time and keeps the engineering gains hidden. Every test ends with a 0% heat command and requires you to verify physically that the heater is off. This is unrelated to TilauPID preheating, which needs no calibration from you.

Starting
Confirming the sheet closes it with a Start a new roast message naming the coffee, and the guided assistant opens and docks itself, ready for the roast.
If the roast still on screen has not been saved, Artisan first asks whether to save it. Cancelling that question leaves the sheet open with everything entered, and nothing is applied: the roast on screen stays as it was, and no stock is taken out of the bag.

Next
- The green coffee this sheet draws from: see BeanCave.
- What the plan contains and what it learns from previous roasts: see The roast plan.
- What the assistant reports once the drum is turning: see The guided roast.
- The devices mentioned here — pairing, limits: see Hardware and peripherals.